We love using our Webbers for leisure riding and dressage in particular as the reduced bulk under our leg ensures our aids are communicated to our horses with less interference. Just like the name, Webbers have a piece of very strong webbing through the core which ensures they are not only ultra-durable but will not stretch and become uneven over time.
While having no buckles and only one thickness of material under your leg is fantastic for rider comfort, if the correct length Webber is not selected and being used properly they will damage your saddle over time. Follow these pro-steps to ensure you are comfortable and your saddle stays in pristine condition!
Before you begin, make sure you have the correct length Webbers
Wintec Webbers are available in three lengths, which we simply refer to as 0, 1 and 2, however we have put some measurements below as a guide for you:
- Size 0 (60 cm or 24″)
- Size 1 (70 cm or 28″)
- Size 2 (80 cm or 32″)
- Size 45 (45cm - KIDS Webbers)
Unfortunately, there is no simple way to determine which length of Webber you will need based on your leg length or your current stirrup strap length. This is due to a number of factors such as saddle flap length and shape, and how you personally prefer the length for the different disciplines you participate in. However as a rough guide, the standard ‘underarm’ test will work on Webbers, the same way that it works on stirrup straps.
To ensure you purchase the right length of Webber, we recommend talking to the saddle specialist at your local store who will assist you in following steps 1 to 4 below.
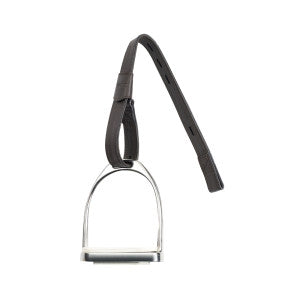
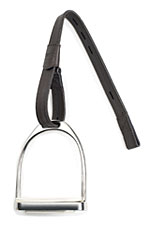
STEP 1: Putting your stirrup iron onto your Webbers (sounds easy?)
We know… by now you have mastered putting stirrup straps on, but with Webbers there is an easy way and a difficult way, and we prefer to keep things easy!
Here are our pro tips:
- Take the Webber sleeve off.
- Thread the looped end of your Webbers through your stirrup iron (it is possible to force the T-shaped buckle end through, but it’s much easier to use the looped end).
- Replace the Webber sleeve.
STEP 2: Adjust your Webbers
Adjust your stirrups by following the below steps, and repeat as necessary until you have achieved your preferred length.
- Locate the T-shaped buckle at the end of your Webbers.
- Fold this end up, behind your stirrup iron and insert into the hole at your preferred length.
- Turn the T-shaped buckle clockwise or anti-clockwise until your Webber is sitting flat, and the buckle is secure.
- Pull the Webber sleeve down firmly to ensure the T-shaped buckle is covered.
STEP 3: Attaching the Webbers to your saddle
Please follow these steps to ensure you are not putting your Webbers on back-to-front!
- Slide the loop of the Webbers over your stirrup bar.
- Make sure the side with the holes on it faces inwards toward your saddle flap, and the smooth side faces outwards.
- Ensure the Webbers hang down on the outside of the top flap so they can release in the event of a fall. Please DO NOT put Webbers underneath the saddle flap as this will restrict their ability to release in the event of a fall.
You may find this step easier to do before your saddle is put on your horse, or before your girth is tightened completely.
STEP 4: Ensure Webber buckle is below your saddle flap
The damage shown in the first photo was caused by the wrong length Webbers being buckled too high. This means that the T-shaped buckle was able to rub on the saddle flap and cause premature wear and irreversible damage. If you are buckling your Webbers on top of your saddle flap, you may need a longer pair.
This may mean that with your own personal leg position, you may not be able to use Webbers for all pursuits, or you may need a second pair for different disciplines such as jumping, as the Webber may buckle too high when you need to move your stirrup irons up into a higher position. All riders are different, and we recommend trialing this in your local store when deciding which length of Webber you need.
STEP 5: Run up your Webbers for safety
When not in use, it is very important to run up your Webbers for safety. If your horse spooks unexpectedly, you or your horse may be hit by a loose stirrup iron, or they may get caught on something and frighten your horse further.
Running up Webbers is similar to running up stirrup straps, however there is one major difference – the T-shaped buckle. Please follow the below steps to run up each of your stirrup irons whenever they are not in use.
- Remove the T-shaped buckle from the slot they have been secured into for riding.
- Insert the T-shaped buckle in the hole at the very top of the Webber. This is up very high near your stirrup bar and you may need to lift the skirt of your saddle to see it.
- Run the stirrup iron up the front or back of the Webber.
- Tuck the folded Webber through the stirrup iron and pull down to secure.